Saturday, November 14, 2009
To see or not to see
HAIKU:
Early spring, early morning
I’m pedaling through sweet air, and
SPLAT! a fucking bug flys right into my ey-!
You need to wear glasses when riding a bike.
My question is why must I spend $80.00 for “cycling” glasses?
I went to the Home Depot and picked a really cool pair of SAFETY GLASSES. They’re safety glasses, for crying out loud! Seems perfect for cycling! $8.00! And I think they look as good as the fancy ones. Even better when you think 80/8!
One thing I noticed– darker lens sunglasses must come off at dusk, then what? These lighter lenses serve double duty for daylight and dusklight. I was using a pair of yellow lenses, like shooting glasses. That’s a real trip! The yellow causes your brain to become more alert, more clarity in quick descision making and the reactions of a ninja.
Anyway, my son needed a pair, loved ‘em and well you know about when your child wants something....
Tush Talk
Most of us are riding away from a pain in the ass... To have one on the ride makes no sense to me.
After trying several different saddles to alleviate my discomfort, I found the Selle Italia Anatomica. I read through the website, I scoured the reviews. It all seemed reasonable. I pulled the trigger and bought one.
My first ride on this saddle, I wasn’t aware of the saddle. WASN’T AWARE OF THE SADDLE?! RIght! From the very first ride this saddle has been a non issue. No pain, no problems, no notice. Each side of the saddle moves independantly from the other. As nice an ass as you may think you have, it’s not symetrical. When you pedal, one sit bone may piston down further than the other one. The Anatomica moves right along with those sit bones. It acts like a hammock. No pressure points. It has a tension screw which will stretch the leather. I adjust this saddle tension, based on the ride I’m about to embark on. Hammerfest with the douchebags from the shop? Tighten it up. Longer base mile ride or meander, loosen it for more comfort. OK? Enough tush talk. When you've read the whole blog, then go click the link on the sidebar.
It's in the bag
Knowing the various problems that may occur on a bike ride, I can’t imagine traveling any lighter.
The obvious is an extra tire tube. I carry two; both individually vacuum sealed in sandwich bags. A patch kit and tire irons fall into the obvious category as well.
A Blackburn canister inflator with one cartidge installed BACKWARDS for storage saves space. If you’ve seen me use one of these things, then you know why I also carry two more cartridges...
On the subject of flat tires; I cut sections of old tire tube to use when “booting” a bad gash. I prefer this more durable method than the folded dollar bill. You see, the dollar fluctuates too much to be reliable...
I do , however, leave a few buck-a-roos in the bag for emergencies as well as a Presta -Schraeder valve adaptor to allow gas stations to serve as air stops (be careful of pressure).
A handful of cable ties and an assortment of hex wrenches round out the stuff that is ALWAYS in the bag.
On longer rides I’ll include a fully charged cell phone and a few snacks for refueling.
Reduce this array of stuff and you’re sure to be inconvenienced or forced to do the walk of shame.
Bicycle Tail Lights
A bright red binking light on the back of your bike will save your life countless times without you even knowing it. So I mounted two...
For all of my first season, I used a single Blackburn Mars 3.0. It is a good quality, bright light with blink or steady light beam choices. No problem, until I read reviews for the new NiteRIder Cherry Bomb. At double the cost, this Cherry Bomb required some attentive investigation.
The technical term for my results is “holy $hit!” This little light is so bright it will probably save my next life as well! If, as a driver, you don’t notice this light, you must be blind.
In my opinion, the light needs to be mounted as if it is pointed directly at a drivers eyes. Any off angle and the intensity falls off. The side spread of the light beam is very good, but head on, it’s like the second coming... Excellent design with regard to the housing, gasket, switch and reflector crystal.
In my opinion, the light needs to be mounted as if it is pointed directly at a drivers eyes. Any off angle and the intensity falls off. The side spread of the light beam is very good, but head on, it’s like the second coming... Excellent design with regard to the housing, gasket, switch and reflector crystal.
I decided to mount one directly on centerline, facing rearward, tucked in under my seatbag. Not ON my seatbag, because there, the light points downward and it’s complete effectiveness is not achieved. I used an old reflector bracket/arm, the one that comes with any new bike, mounted to the seat post. This arm allows the tilting adjustment required to position the light for maximum effectiveness.
Since I’m the kind of guy that wears a belt AND suspenders (just a metaphor), I mounted a second Cherry Bomb on the bottom of the roadside seat stay. Again, this one is angled upwards slightly. I used a rubber sleeved pipe strap to fit my seat stay diameter. Neat, simple and clean.
So now, with my two Cherry Bombs carefully positioned, drivers must think they’re coming up on an emergency vehicle or a UFO.
I duplicated this set up on my twenty-three year old daughter’s Specialized Dolce, for she has a similar riding regimen and needs to preserve her life as well...
What about the old trusty Blackburn? I mounted that on my fourteen year old son’s new Trek 1.2 for his daylight rides. But soon, he too will appear as a Cherry Bombed UFO on the roads of New Jersey.
Friday, November 13, 2009
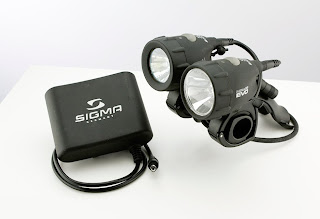
Sigma Evo Pro Headlights
My normal riding schedule has me rolling out of the driveway at 6:00AM. For a good part of the year, it’s dark at that time of the morning and a good lighting system is neccessary .
My research began, both on-line and at various LBS. After balancing price and quality, I settled on the Sigma Evo Pro. Good quality build, good design and as it turned out; slightly above average lighting ability and very poor battery life. I was penny wise and pound foolish. The LBS would not exchange, nor allow a return.
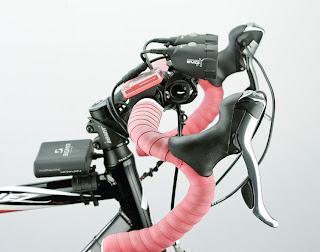
I believe this two light, one battery system was bundled by Sigma from existing, but separate product lines. The battery plugs into a yoke splitter which connects to each light head. The battery simply cannot support both lights at full power for more than 30 minutes. Fortunately, one of the light heads has a full power/low power selector switch.
So the work around for this shortcoming is to only use both heads at full power in the darkest, ie. park trails, or high traffic areas. Otherwise, it’s one head at full and the other at half power. It’s not terrible, and I have become accustomed to the characteristics of the two light beams, one being a flood and the other a spot. I simply direct the flood down to the road in front of me, which illuminates approximately 15 feet up front and 10 feet to either side. The other head, the spot, drills through the darkness out to about 40 feet and it’s spot circle is approximately 6 feet in diameter. That’s at full power...low power is not much help at all.
With this workaround, I get just over one hour of battery life, which is OK with me most of the time, since the sun comes up just as this battery dies down.
The system is designed such that a second battery could be mounted so each light head has it's own. WIth the added expense of an additional battery, the system is still priced far below the fine offerings available today.
The system is designed such that a second battery could be mounted so each light head has it's own. WIth the added expense of an additional battery, the system is still priced far below the fine offerings available today.
Subscribe to:
Comments (Atom)


